
Canvas apps are a great way to cover simple, as well as complex needs of business users. As a maker of such an app, you probably have a precise idea of how the app, buttons and functions should be used. But whether your users actually use it that way is another story. Now you’re faced with the dilemma: How do I get feedback? So far there was no real way to capture direct usage … unless you stalk your users or ask them in person … And who wants that, right?!
Thomy Gölles led me down a cool little rabbit hole with the simple question, “Do you know Microsoft Clarity and do you think it can be used with Power Apps?” So cheers to Thomy, as I love rabbit holes.
Without further ado here is the good stuff:
Prerequsites
To get things of the ground we need the following ingredients:
- One Power Platform canvas app we want to capture the usage of
- One Microsoft Clarity Account (it is free forever … they say)
- Visual Studio Code (free as well and an all time favorite)
- node.js (you probally can guess it by now … free)
- Microsoft Power Platform CLI (free … really I am not kidding)
- A shot of knowledge about the Power Apps component framework (free knowledge … I can also recommend this Microsoft Learn article on this topic)
- .NET 5.x SDK (somebody needs to build our mix, right? … free by the way)
Create a new Microsoft Clarity Project
Of course, we need a Microsoft Clarity project in order to have a code snippet we can use in our app:
- Simply log into your account on https://clarity.microsoft.com/
- Add a new project and put in some meaningful things in there
- We will be redirected to the setup page where we will extract the Clarity tracking code and save it in a text editor of our choice.
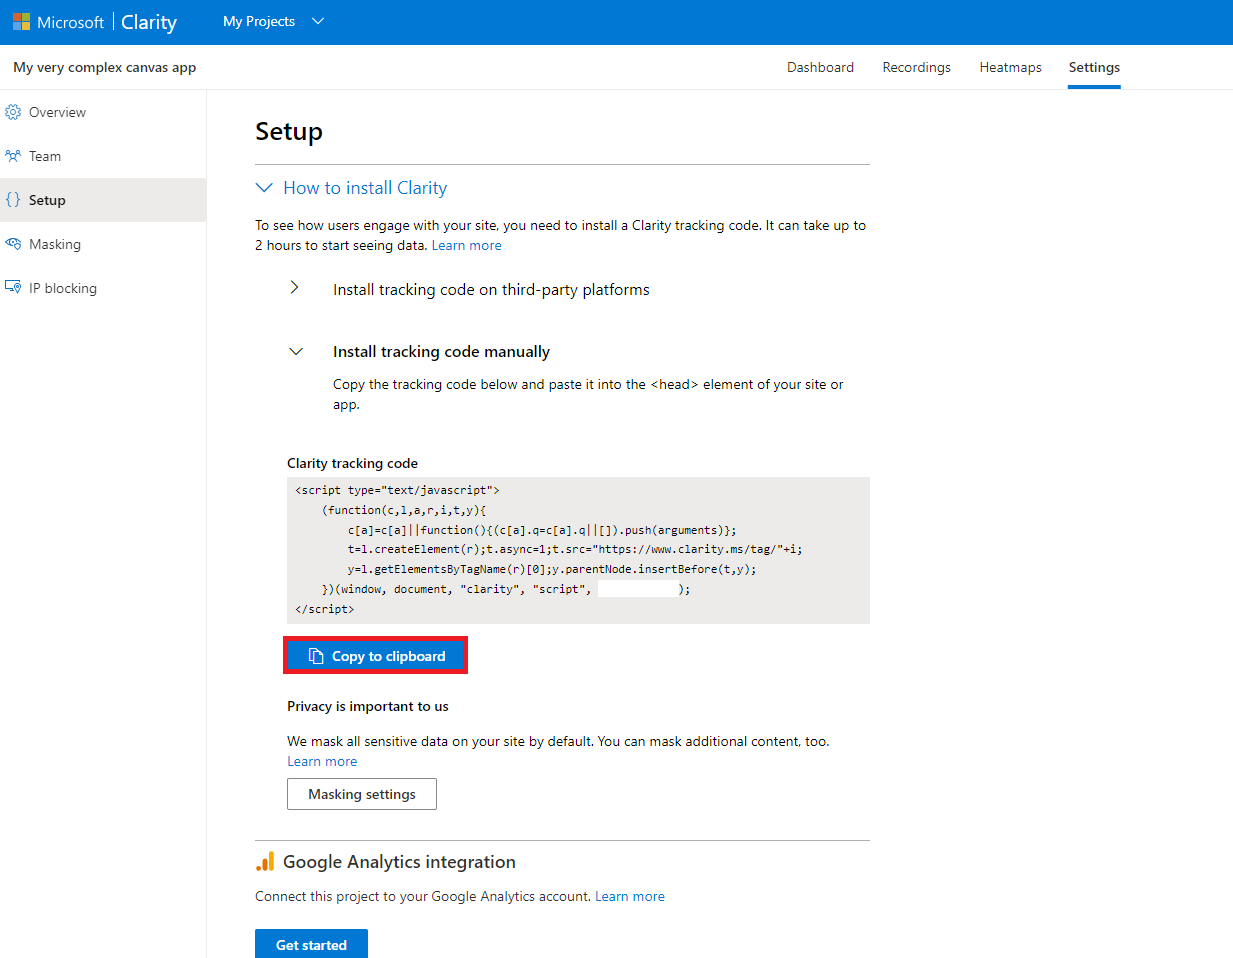
Great! Now we have our Clarity code snippet, which we will need in the Power Apps code component we are now creating.
Create a new component project
We will start with the set up on the local machine by creating a new folder:
CLI
mkdir ClarityCodeSnippet
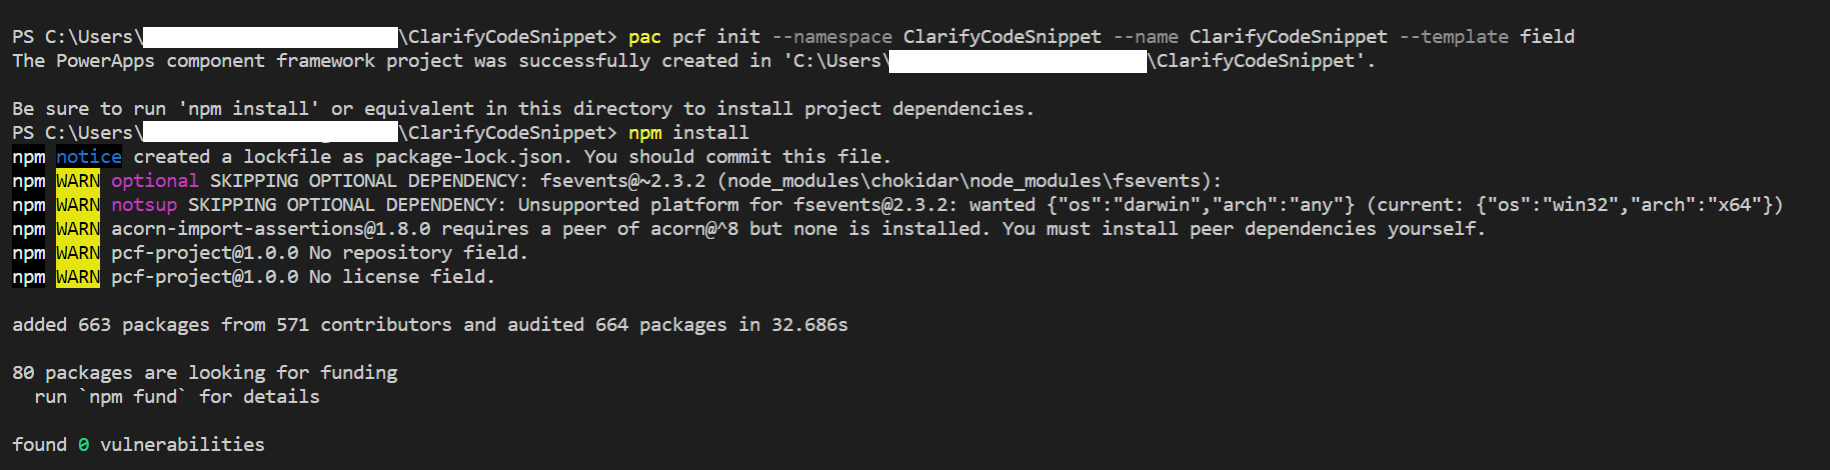
Open the “ClarityCodeSnippet” folder inside VS Code and open the build-in terminal. Within the terminal prompt, create a new project with the following parameters:
CLI
pac pcf init --namespace ClarityCodeSnippet --name ClarityCodeSnippet --template field
After this we will run npm install to set up the build tools (ignore the warnings and live dangerously).
Manifest
Don’t be scared of the monster of a template we are facing and just replace everything in the file “ClarityComponent/ControlManifest.Input.xml” with this
<?xml version="1.0" encoding="utf-8" ?>
<manifest>
  <control namespace="ClarityNameSpace" constructor="ClarityComponent" version="1.0.0" display-name-key="Clarity Component" description-key="Clarity Component to track your app screen" control-type="standard" >
    <property name="YourClarityProjectID" display-name-key="Your Clarity Project ID" description-key="Your Clarity ID" of-type="SingleLine.Text" usage="bound" required="true" />
    <external-service-usage enabled="false">
    </external-service-usage>
    <resources>
      <code path="index.ts" order="1"/>
    </resources>
  </control>
</manifest>
index.ts
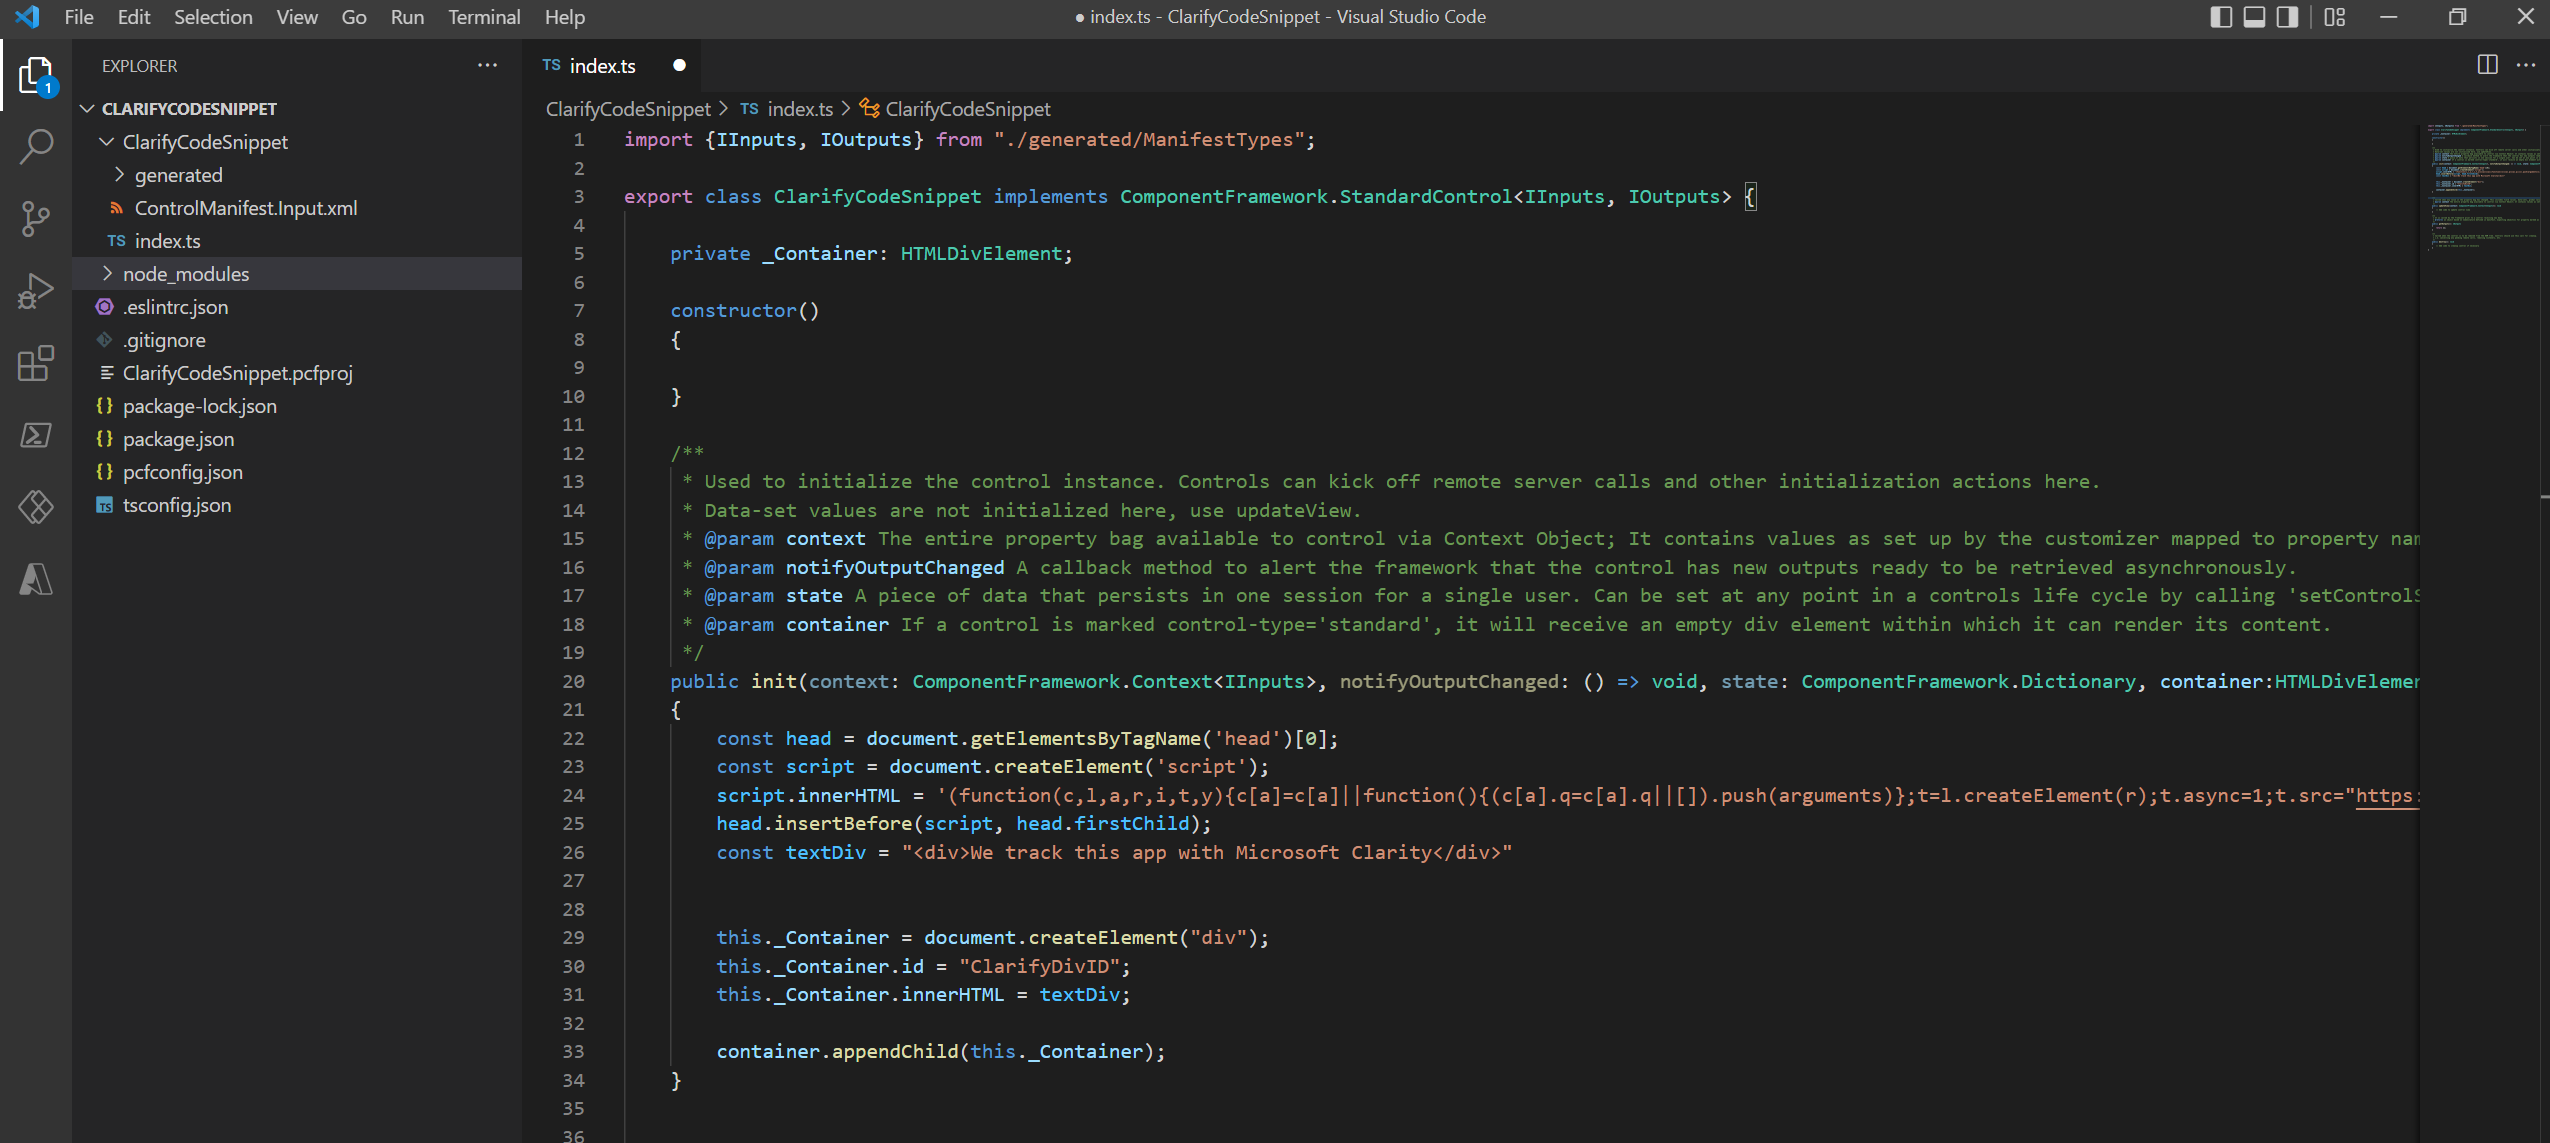
After this we have to modify our “index.ts” file:
- Above the constructor insert
private _Container: HTMLDivElement; - Replace the emptiness in the init method with the following code:
const head = document.getElementsByTagName('head')[0];
const script = document.createElement('script');
script.innerHTML = '(function(c,l,a,r,i,t,y){c[a]=c[a]||function(){(c[a].q=c[a].q||[]).push(arguments)};t=l.createElement(r);t.async=1;t.src="https://www.clarity.ms/tag/"+i;y=l.getElementsByTagName(r)[0];y.parentNode.insertBefore(t,y);})(window, document, "clarity", "script", "yourClarityProjectID");'
head.insertBefore(script, head.firstChild);
const textDiv = "<div>We track this app with Microsoft Clarity</div>"


this._Container = document.createElement("div");
this._Container.id = "ClarityDivID";
this._Container.innerHTML = textDiv;

container.appendChild(this._Container);
Important: Replace “yourClarityProjectID” with your own ID from the previously saved Clarity Snippet. Don’t forget to save both files!
Well, well, well … look at us … doing TypeScript coding!
Build, debug and package your code component
Within the terminal session in VS Code run the following command:
npm run build
Now we can test our component for the first time:
npm start watch
Note: This will start a browser and a rather boring debugging session. Fun fact: We will also see this session in our Clarity project.
Now we have to package our code component
- Create a new folder inside the root folder “ClarityCodeSnippet” named “Solutions”
- Create a new solution in “ClarityCodeSnippet\Solutions”
pac solution init --publisher-name YourPublisherName --publisher-prefix ypn
- Now we have to refer to the location where the component is located
pac solution add-reference --path ..\
- Exciting … now we build it by simply running:
dotnet build
After the dust of the build process has settled, we will find our zipped solution in Solution\bin\debug
Intermission
In order to be able to insert the solution in the app, we first need to enable the option in the tenant. Follow this guide for it: Enable the Power Apps component framework feature
Import, add and enjoy your code component
Now the time has come for us to bring it all together and enjoy our rewards:
- We open up a browser of our choice and go to Power Apps Portal
- Switch to the “Solution” tab and click on “Import”
- Choose the zipped solution within
Solution\bin\debugfolder - Wait until the solution is uploaded
- Go to the app and open it in edit mode
- Switch to the “Insert” tab
- Add a “Custom” element and choose “Import components”
- Switch to the “Code” tab and choose the imported solution
- Now we can add our Clarity code snippet anywhere we want in the app
- After the app is published and a user launches the app, data is already sent to Clarity.
Noteworthy
When a project is created on Clarity, it can take up to 2 hours for data to arrive. Additionally, each session that is recorded can take up to 30 minutes to show up in https://clarity.microsoft.com/. Quite long for an impatient person like me.
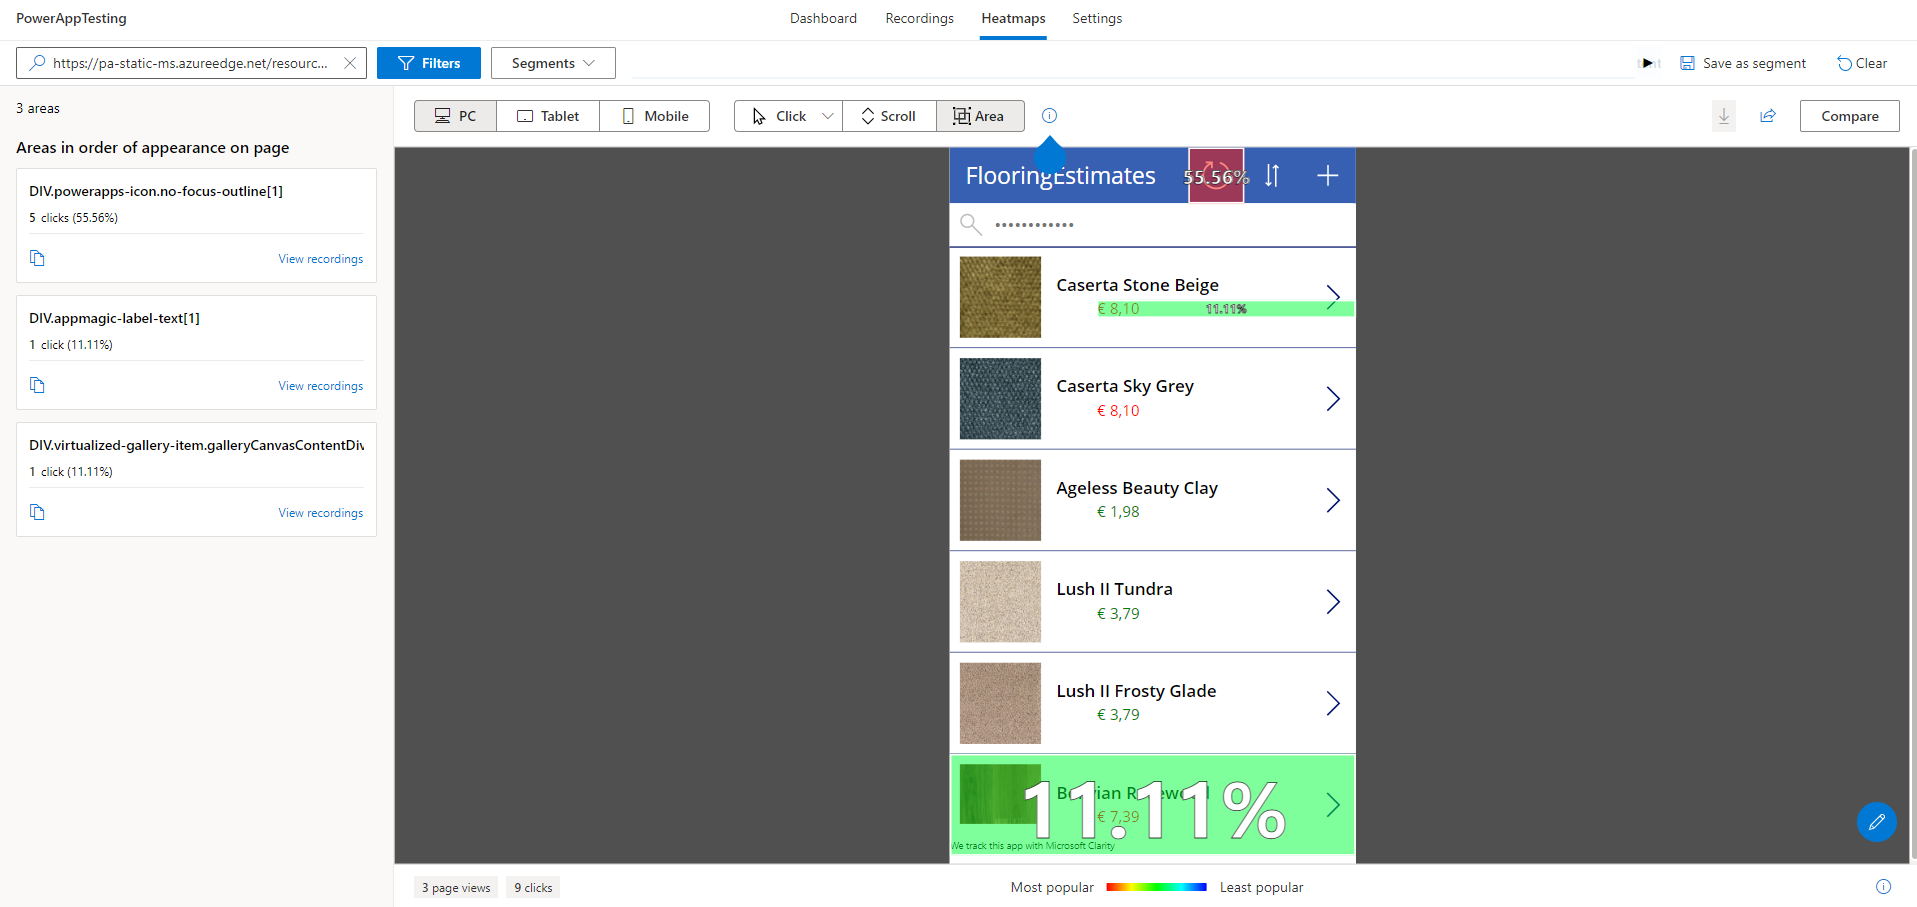
Summery
In general, it’s a very good way to track the usage of an app. You can see where users click, which elements of your app might not get attention or which ones need a little adjustment to make the users life easier.